•
구성
1.
공유기 포트포워딩
규칙 이름 rasp_msqt
mqtt Broker 즉 라즈베리파이 IP 번호 192.168.0.48
통신 규칙 tcp
외부 포트 2883-2883
내부 포트 1883-1883
2.
라즈베리파이는 IPTIME 공유기에 연결되어있는 상태로써 192.168.0.48 ip를 할당 받은 상태
3.
아두이노는 IPTIME 공유기에 연결되어있는 상태로써 192.168.0.47 ip를 할당 받은 상태
4.
프로그래밍은 윈도우 vscode로 포트포워딩하여 라즈베리파이에 원격 접속 후 개발하고 있는 상태
•
시작
•
라즈베리파이 시작 하고 나서 아래의 경로간다.
pi@raspberrypi:~ $ cd /etc/mosquitto/
JavaScript
복사
•
sudo nano를 이용하여 conf 파일 편집기를 실행한다.
pi@raspberrypi:/etc/mosquitto $ sudo nano mosquitto.conf
JavaScript
복사
•
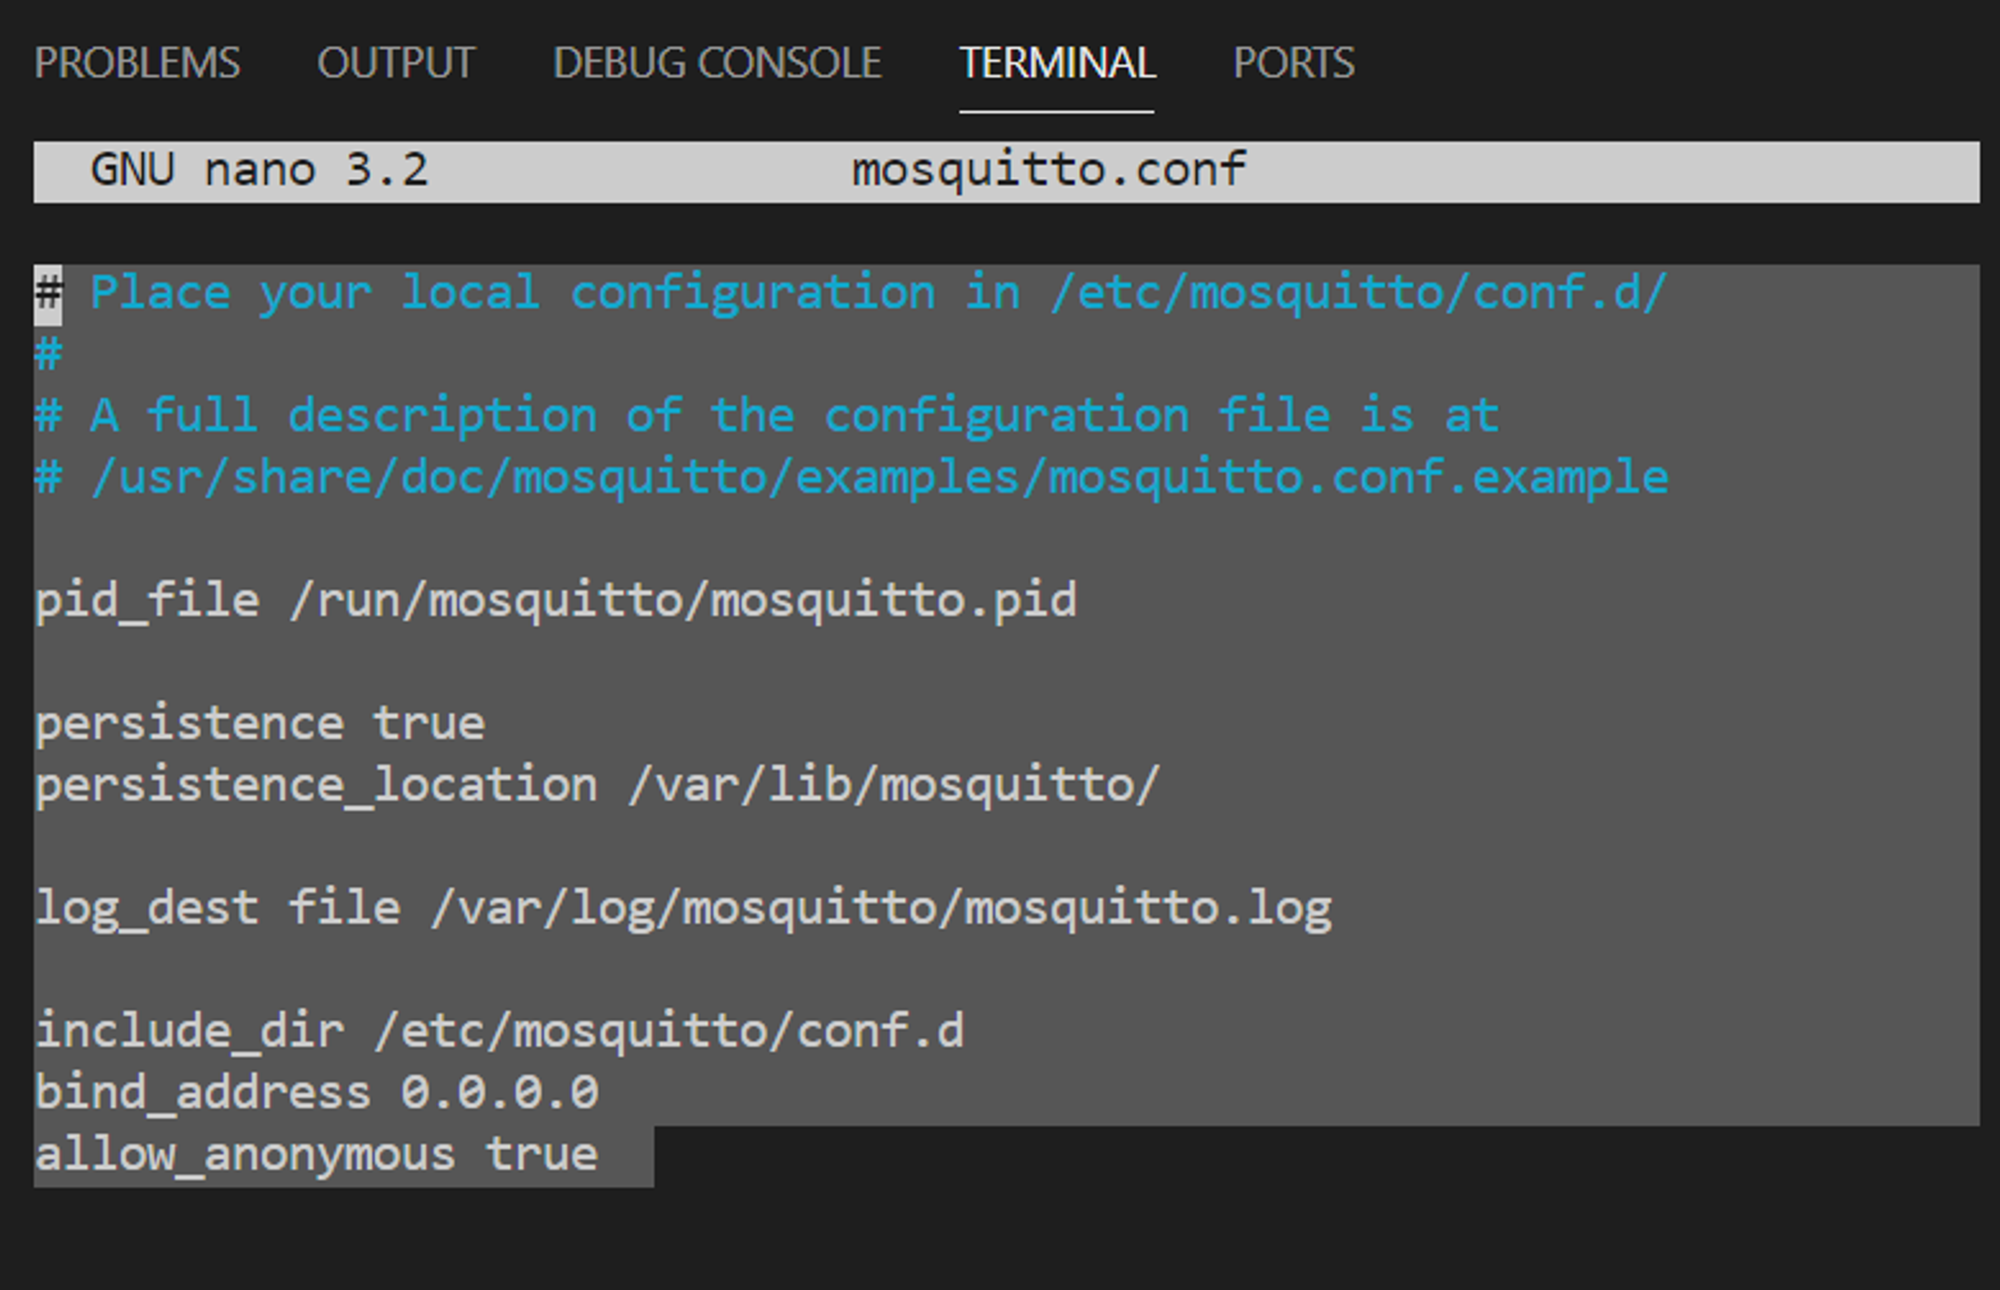
기본내용은 다음과 같다.
# Place your local configuration in /etc/mosquitto/conf.d/
#
# A full description of the configuration file is at
# /usr/share/doc/mosquitto/examples/mosquitto.conf.example
pid_file /run/mosquitto/mosquitto.pid
persistence true
persistence_location /var/lib/mosquitto/
log_dest file /var/log/mosquitto/mosquitto.log
include_dir /etc/mosquitto/conf.d
JavaScript
복사
•
여기에서 이 두줄을 추가한다. (bind_address의 의미는 오른쪽에 적힌 ip주소가 bind 하는것에 허락하는 의미인데, 0.0.0.0 의 의미는 모든 ip를 의미한다. 그리고 권한을 부여하기 위해 allow_anonymous 값을 true로 바꿔준다.)
bind_address 0.0.0.0
allow_anonymous true
JavaScript
복사
•
예시 화면
•
bind adress는 mqtt broker에 접속을 허가하는 아이피를 작성하는 것으로 0.0.0.0 을 작성하면 모든 아이피를 허용 한다는 뜻이다.
저장 하고 다음 과 같은 내용을 작성한다. ( mqtt 재실행작업이다. 매우중요하다.)
•
실행화면
pi@raspberrypi:/etc/mosquitto $ sudo systemctl restart mosquitto
JavaScript
복사
•
vs code에서 cmd 창을 하나 더 열어서 sub를 열어준다. (sub 이름은 glory로 설정)
pi@raspberrypi:~ $ mosquitto_sub -t glory
JavaScript
복사
•
그리고 대기 상태면 다른 창에 이렇게 작성한다.
pi@raspberrypi:/etc/mosquitto $ mosquitto_pub -t glory -m "hello sub I am pub"
JavaScript
복사
•
실행 화면

•
예시 화면 2

윈도우에서 라즈베리파이에게 mqtt 보내기
C:\Program Files\mosquitto>mosquitto_pub.exe -h 192.168.0.48 -t glory -m "window"
JavaScript
복사
•
실행화면

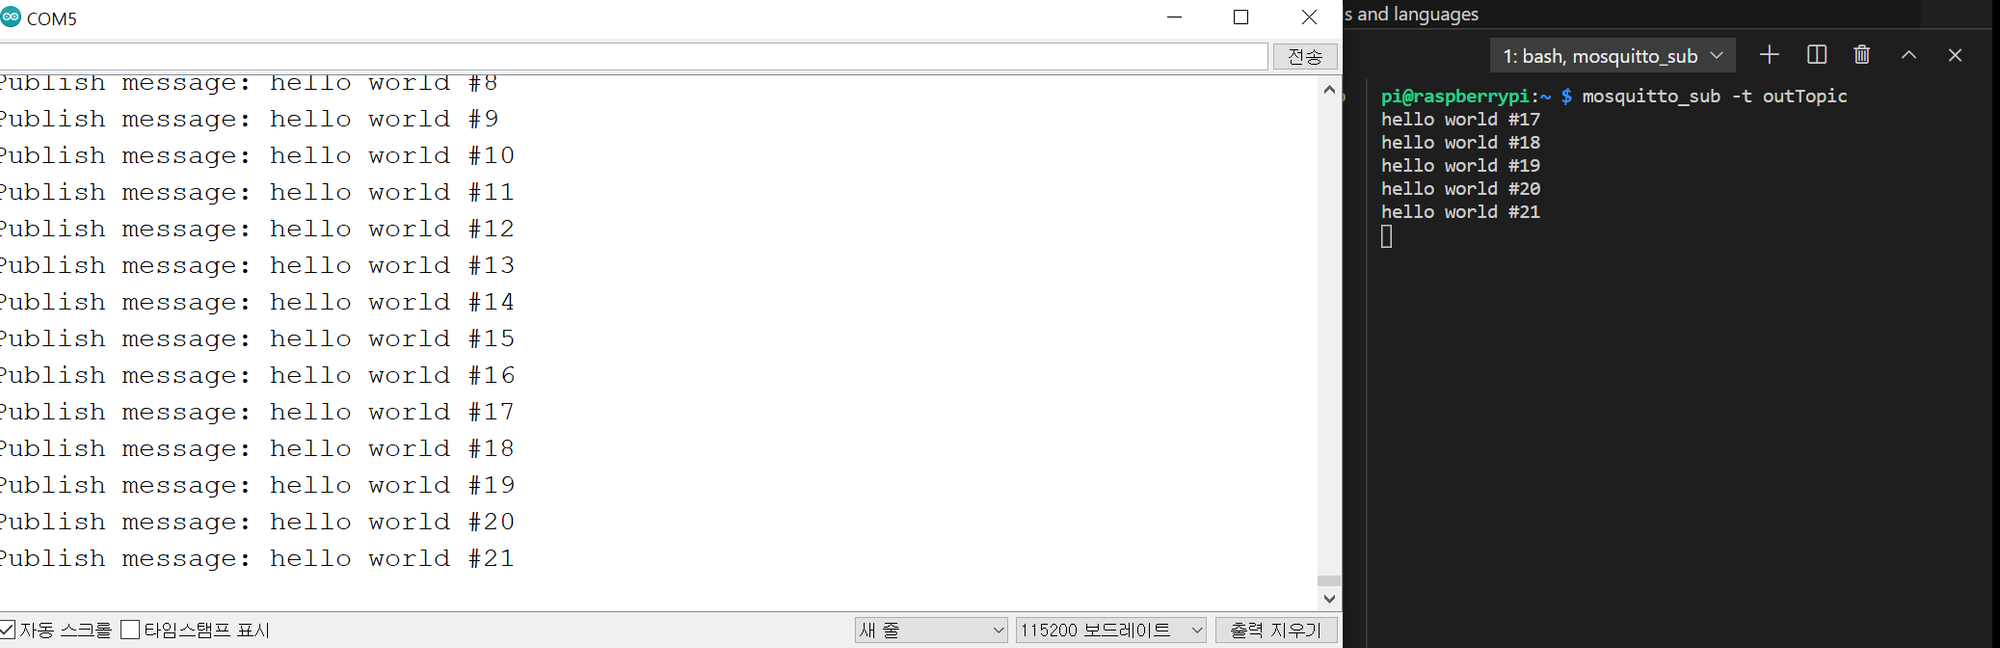
아두이노에서 라즈베리파이에게 mqtt pub 하기
•
아두이노 소스코드
/*
Basic ESP8266 MQTT example
This sketch demonstrates the capabilities of the pubsub library in combination
with the ESP8266 board/library.
It connects to an MQTT server then:
- publishes "hello world" to the topic "outTopic" every two seconds
- subscribes to the topic "inTopic", printing out any messages
it receives. NB - it assumes the received payloads are strings not binary
- If the first character of the topic "inTopic" is an 1, switch ON the ESP Led,
else switch it off
It will reconnect to the server if the connection is lost using a blocking
reconnect function. See the 'mqtt_reconnect_nonblocking' example for how to
achieve the same result without blocking the main loop.
To install the ESP8266 board, (using Arduino 1.6.4+):
- Add the following 3rd party board manager under "File -> Preferences -> Additional Boards Manager URLs":
http://arduino.esp8266.com/stable/package_esp8266com_index.json
- Open the "Tools -> Board -> Board Manager" and click install for the ESP8266"
- Select your ESP8266 in "Tools -> Board"
*/
#include <ESP8266WiFi.h>
#include <PubSubClient.h>
// Update these with values suitable for your network.
const char* ssid = "glory";
const char* password = "------";
const char* mqtt_server = "192.168.0.48";
WiFiClient espClient;
PubSubClient client(espClient);
unsigned long lastMsg = 0;
#define MSG_BUFFER_SIZE (50)
char msg[MSG_BUFFER_SIZE];
int value = 0;
void setup_wifi() {
delay(10);
// We start by connecting to a WiFi network
Serial.println();
Serial.print("Connecting to ");
Serial.println(ssid);
WiFi.mode(WIFI_STA);
WiFi.begin(ssid, password);
while (WiFi.status() != WL_CONNECTED) {
delay(500);
Serial.print(".");
}
randomSeed(micros());
Serial.println("");
Serial.println("WiFi connected");
Serial.println("IP address: ");
Serial.println(WiFi.localIP());
}
void callback(char* topic, byte* payload, unsigned int length) {
Serial.print("Message arrived [");
Serial.print(topic);
Serial.print("] ");
for (int i = 0; i < length; i++) {
Serial.print((char)payload[i]);
}
Serial.println();
// Switch on the LED if an 1 was received as first character
if ((char)payload[0] == '1') {
digitalWrite(BUILTIN_LED, LOW); // Turn the LED on (Note that LOW is the voltage level
// but actually the LED is on; this is because
// it is active low on the ESP-01)
} else {
digitalWrite(BUILTIN_LED, HIGH); // Turn the LED off by making the voltage HIGH
}
}
void reconnect() {
// Loop until we're reconnected
while (!client.connected()) {
Serial.print("Attempting MQTT connection...");
// Create a random client ID
String clientId = "ESP8266Client-";
clientId += String(random(0xffff), HEX);
// Attempt to connect
if (client.connect(clientId.c_str())) {
Serial.println("connected");
// Once connected, publish an announcement...
client.publish("outTopic", "hello world");
// ... and resubscribe
client.subscribe("inTopic");
} else {
Serial.print("failed, rc=");
Serial.print(client.state());
Serial.println(" try again in 5 seconds");
// Wait 5 seconds before retrying
delay(5000);
}
}
}
void setup() {
pinMode(BUILTIN_LED, OUTPUT); // Initialize the BUILTIN_LED pin as an output
Serial.begin(115200);
setup_wifi();
client.setServer(mqtt_server, 1883);
client.setCallback(callback);
}
void loop() {
if (!client.connected()) {
reconnect();
}
client.loop();
unsigned long now = millis();
if (now - lastMsg > 2000) {
lastMsg = now;
++value;
snprintf (msg, MSG_BUFFER_SIZE, "hello world #%ld", value);
Serial.print("Publish message: ");
Serial.println(msg);
client.publish("outTopic", msg);
}
}
Arduino
복사
•
라즈베리파이에 입력할 명령어
pi@raspberrypi:~ $ mosquitto_sub -t outTopic
Arduino
복사
•
실행화면
주의! 1. 라즈베리파이 방화벽 설정은 다음과 같음
•
ufw가 없을 경우 sudo apt-get install ufw 명령어를 입력해서 설치 할 것
pi@raspberrypi:/etc/mosquitto $ sudo ufw status
Status: active
To Action From
-- ------ ----
1883 ALLOW Anywhere
22 ALLOW Anywhere
1883 (v6) ALLOW Anywhere (v6)
22 (v6) ALLOW Anywhere (v6)
pi@raspberrypi:/etc/mosquitto $
Arduino
복사
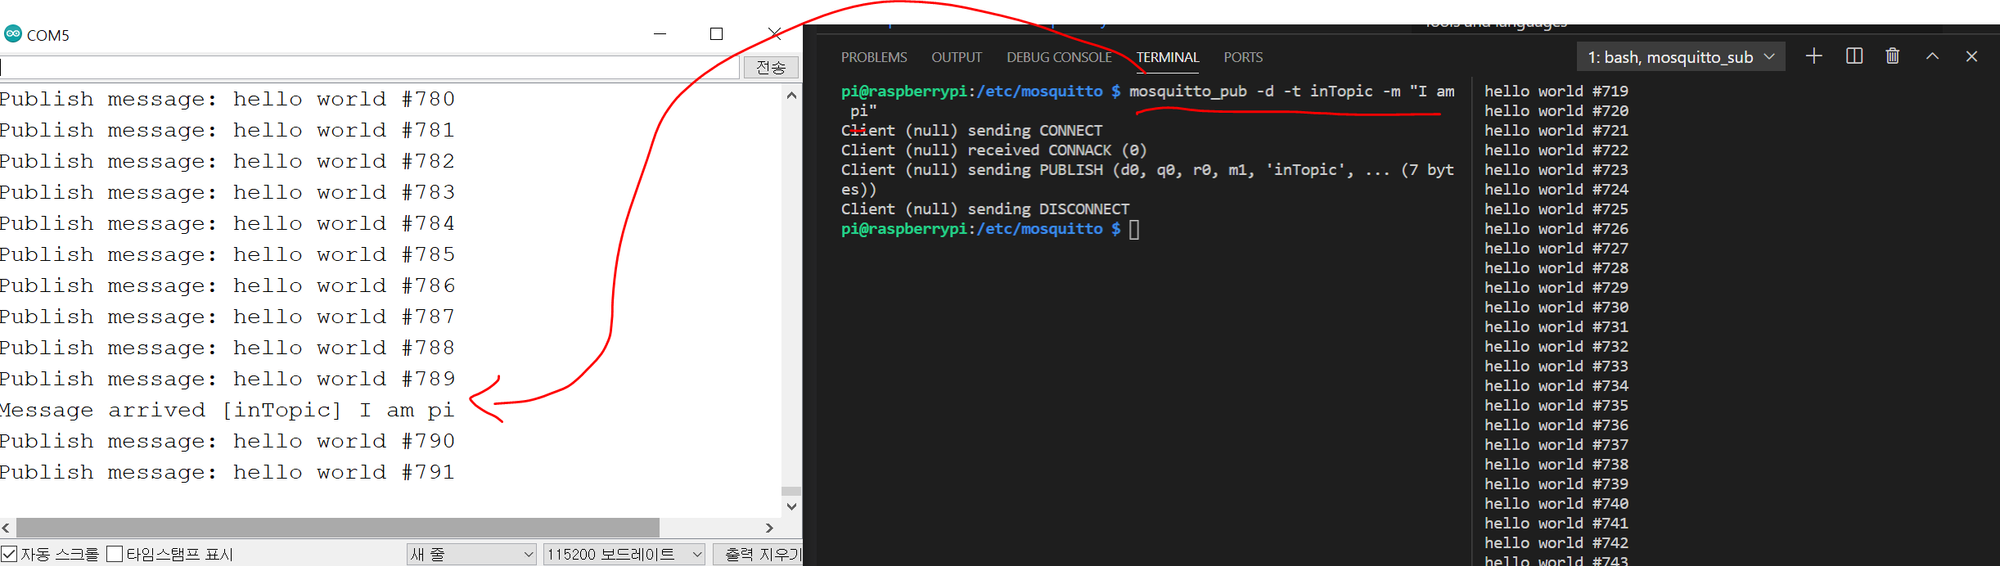
라즈베리파이에서 아두이노에게 pub 보내기
•
실행 화면
pi@raspberrypi:/etc/mosquitto $ mosquitto_pub -d -t inTopic -m "I am pi"
Client (null) sending CONNECT
Client (null) received CONNACK (0)
Client (null) sending PUBLISH (d0, q0, r0, m1, 'inTopic', ... (7 bytes))
Client (null) sending DISCONNECT
pi@raspberrypi:/etc/mosquitto $
Arduino
복사
•
캡처화면
윈도우에서 라즈베리파이를 통해 아두이노에게 pub 보내기 (모든과정 MQTT)
•
실행 화면
C:\Program Files\mosquitto>mosquitto_pub.exe -h 192.168.0.48 -t inTopic -m "Iam Window"
C:\Program Files\mosquitto>
Arduino
복사
•
캡처화면

본 포스팅은 여기서 마치도록 한다.
•
추후 안드로이드 어플리케이션 개발 , Nodejs 융합, MogoDB 융합 작업은 비공개 포스팅으로 할 예정이다.
•
관련 문의는 yklovejesus@gmail.com으로 연락하길 바란다. 
최종 mqtt 용어 정리
윈도우 -> 라즈베리파이 : (Window) mosquitto_pub.exe -h 192.168.0.48 -t glory -m "window"
/// 선행조건이 있는데 라즈베리파이가 mosquitto_sub -t glory 이 활성화가 되어야 한다.
라즈베리파이 -> 윈도우 : (Window) mosquitto_sub.exe -h 192.168.0.72 -t glory
(rasp) mosquitto_pub -d -t glory -m "I am pi"
라즈베리파이 -> 아두이노 : (rasp) mosquitto_pub -d -t inTopic -m "I am pi"
아두이노 -> 라즈베리파이 : (rasp) mosquitto_sub -t outTopic
윈도우 -> 라즈베리파이 -> 아두이노 : (Window) mosquitto_pub.exe -h 192.168.0.72 -t inTopic -m "I am Window"
아두이노 -> 라즈베리파이 -> 윈도우 : (Window) mosquitto_sub.exe -h 192.168.0.72 -t outTopic
Arduino
복사