1
[출처]


[리눅스] E45: 'readonly' option is set (add ! to override) 에러
해결 방법
1. sudo 명령어를 통해서 관리자(ROOT) 권한으로 전환
2. 문제의 파일을 열어서 수정해보세요.
명령어 공유
$ sudo vi 파일이름

추가정보
위의 방법으로 해결이 안될 경우, 저장하실때 wq 명령어 대신 w! 명령어를 사용해 보세요!
2
[출처]


•
잭슨나노에서 opencv를 호출하기위해서 import cv2 호출하던 도중 illegal instructions (core dumped) 라는 메세지와 함께 opencv 가 실행되지 않았습니다.
•
해결방법
•
Cython, numpy 등의 다른 라이브러리 호출에도 illegal instructions가 뜨면 아래 명령어로 해결가능
$ export OPENBLAS_CORETYPE=ARMV8
[출처]


4. (220321) Install Pytorch on Jetson Nano.
[출처]
5. Jetcam 소스코드
•
그럼 이제 nvidia에서 공식적으로 지원하는 jetcam 소스코드를 활용해보자
/jetcam/jetcam/camera.py
import traitlets
import threading
import numpy as np
class Camera(traitlets.HasTraits):
value = traitlets.Any()
width = traitlets.Integer(default_value=224)
height = traitlets.Integer(default_value=224)
format = traitlets.Unicode(default_value='bgr8')
running = traitlets.Bool(default_value=False)
def __init__(self, *args, **kwargs):
super(Camera, self).__init__(*args, **kwargs)
if self.format == 'bgr8':
self.value = np.empty((self.height, self.width, 3), dtype=np.uint8)
self._running = False
def _read(self):
"""Blocking call to read frame from camera"""
raise NotImplementedError
def read(self):
if self._running:
raise RuntimeError('Cannot read directly while camera is running')
self.value = self._read()
return self.value
def _capture_frames(self):
while True:
if not self._running:
break
self.value = self._read()
@traitlets.observe('running')
def _on_running(self, change):
if change['new'] and not change['old']:
# transition from not running -> running
self._running = True
self.thread = threading.Thread(target=self._capture_frames)
self.thread.start()
elif change['old'] and not change['new']:
# transition from running -> not running
self._running = False
self.thread.join()
Python
복사
•
상기 내용을 보면 라이브러리를 몇개 설치해야하는 것을 알수있다.
pip3 isntall traitlets
or
pip install traitlets
Python
복사
•
그리고 넘파이도 한번 설치해주자
pip install numpy
Python
복사
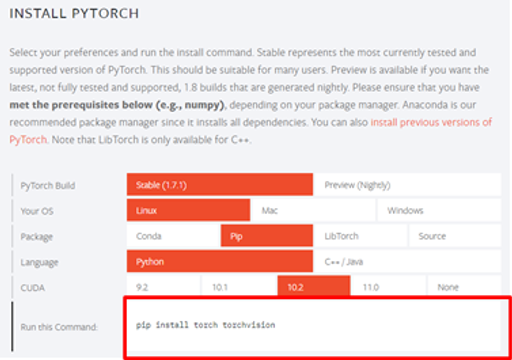
6. Jetson 보드에 pytorch 설치하기
•
출처

•
파이썬은 python3 기반이 설치가 잘 되는 것 같다. 참고하자.
•
주의할 점은 torchvision과 torch 버전이 서로 호환되는걸 설치해야하는 것 같다.
7. Jetson Nano 관련 기술 블로그 추천


•
서버 업데이트 및 jetson status 설치
sudo apt update
sudo apt upgrade
sudo apt install python-pip
sudo -H pip install jetson-stats
jetson_release
•
OpenCV 4.5.x with CUDA
wget
sudo chmod 755 ./OpenCV-4-5-4.sh
./OpenCV-4-5-4.sh
rm OpenCV-4-5-4.sh
•
상기 명령어를 입력한다. 그리고 아래의 코드를 하나 만든다.
/main.py
```
import cv2
a=cv2.__version__
print(a)
```
•
python3 main.py 명령어로 실행해보니, illegal instructions (core dumped) 오류가 뜨더라
•
opencv를 재설치해도 오류가 뜨더라
•
통상 버전 오류라고 하는데 Cython, Numpy등 라이브러리 호출에도 똑같이 이런 오류가 뜰수 있는데 아래의 명령어로 해결하면된다.
```
export OPENBLAS_CORETYPE=ARMV8
```
•
그리고 실행해본결과 버전은 4.5.5로 설치 된다.
•
------------------------
# Pytorch 1.8.x 설치
출처 :
•
pytorch 1.8.0 다운로드 및 dependencies 설치
wget
-O torch-1.8.0-cp36-cp36m-linux_aarch64.whl
sudo apt-get install libopenblas-base libopenmpi-dev
•
Cytorch, Numpy, Pytorch 설치
pip3 install Cython
pip3 install numpy torch-1.8.0-cp36-cp36m-linux_
aarch64.whl
•
torchvision dependencies 설치
sudo apt-get install libjpeg-dev zlib1g-dev libpython3-dev libavcodec-dev libavformat-dev libswscale-dev
•
# see below for version of torchvision to download
•
여기서 중요한게 밑에 코드는 0.9.0로 했지만 본인 torch 버전에 따라 0.9.0을 쓸지 아니면 다른걸 쓸지를 결정해야한다.
•
나는 여기서 torch 1.8.0 을 쓰고 있어서 0.9.0 버전의 torchvision을 설치했다.
git clone --branch v0.9.0
torchvision
cd torchvision
•
# where 0.x.0 is the torchvision version
export BUILD_VERSION=0.9.0
•
# use python3 if installing for Python 3.6
python3 setup.py install --user
conda install pytorch==1.9.0 torchvision==0.10.0 torchaudio==0.9.0 cudatoolkit=10.2 -c pytorch

안녕하세요
•
한국전자기술연구원 김영광입니다.
•
관련 기술 문의와 R&D 공동 연구 사업 관련 문의는 “glory@keti.re.kr”로 연락 부탁드립니다.
Hello
•
I'm Yeonggwang Kim from the Korea Electronics Research Institute.
•
For technical and business inquiries, please contact me at “glory@keti.re.kr”