•
Splash Screen 개발 (Asset, Stateless, Widget, Column, HexCode)
초기작업
•
해당 경로에 png 로고 파일을 넣는다.
•
/Users/zeus/Desktop/splash/asset/img/logo.png
•
asset 폴더를 추가한것으로 알수 있는데, 여기에 그냥 로고만 넣게 된다면 플러터는 이 파일을 찾지 못할 수 있다.
•
‘pubspec.yaml’ 파일을 손을 봐줘야 한다.
/Users/zeus/Desktop/splash/pubspec.yaml
name: glory
description: A new Flutter project.
# The following line prevents the package from being accidentally published to
# pub.dev using `flutter pub publish`. This is preferred for private packages.
publish_to: 'none' # Remove this line if you wish to publish to pub.dev
# The following defines the version and build number for your application.
# A version number is three numbers separated by dots, like 1.2.43
# followed by an optional build number separated by a +.
# Both the version and the builder number may be overridden in flutter
# build by specifying --build-name and --build-number, respectively.
# In Android, build-name is used as versionName while build-number used as versionCode.
# Read more about Android versioning at https://developer.android.com/studio/publish/versioning
# In iOS, build-name is used as CFBundleShortVersionString while build-number is used as CFBundleVersion.
# Read more about iOS versioning at
# https://developer.apple.com/library/archive/documentation/General/Reference/InfoPlistKeyReference/Articles/CoreFoundationKeys.html
# In Windows, build-name is used as the major, minor, and patch parts
# of the product and file versions while build-number is used as the build suffix.
version: 1.0.0+1
environment:
sdk: '>=2.19.4 <3.0.0'
# Dependencies specify other packages that your package needs in order to work.
# To automatically upgrade your package dependencies to the latest versions
# consider running `flutter pub upgrade --major-versions`. Alternatively,
# dependencies can be manually updated by changing the version numbers below to
# the latest version available on pub.dev. To see which dependencies have newer
# versions available, run `flutter pub outdated`.
dependencies:
flutter:
sdk: flutter
# The following adds the Cupertino Icons font to your application.
# Use with the CupertinoIcons class for iOS style icons.
cupertino_icons: ^1.0.2
dev_dependencies:
flutter_test:
sdk: flutter
# The "flutter_lints" package below contains a set of recommended lints to
# encourage good coding practices. The lint set provided by the package is
# activated in the `analysis_options.yaml` file located at the root of your
# package. See that file for information about deactivating specific lint
# rules and activating additional ones.
flutter_lints: ^2.0.0
# For information on the generic Dart part of this file, see the
# following page: https://dart.dev/tools/pub/pubspec
# The following section is specific to Flutter packages.
flutter:
# The following line ensures that the Material Icons font is
# included with your application, so that you can use the icons in
# the material Icons class.
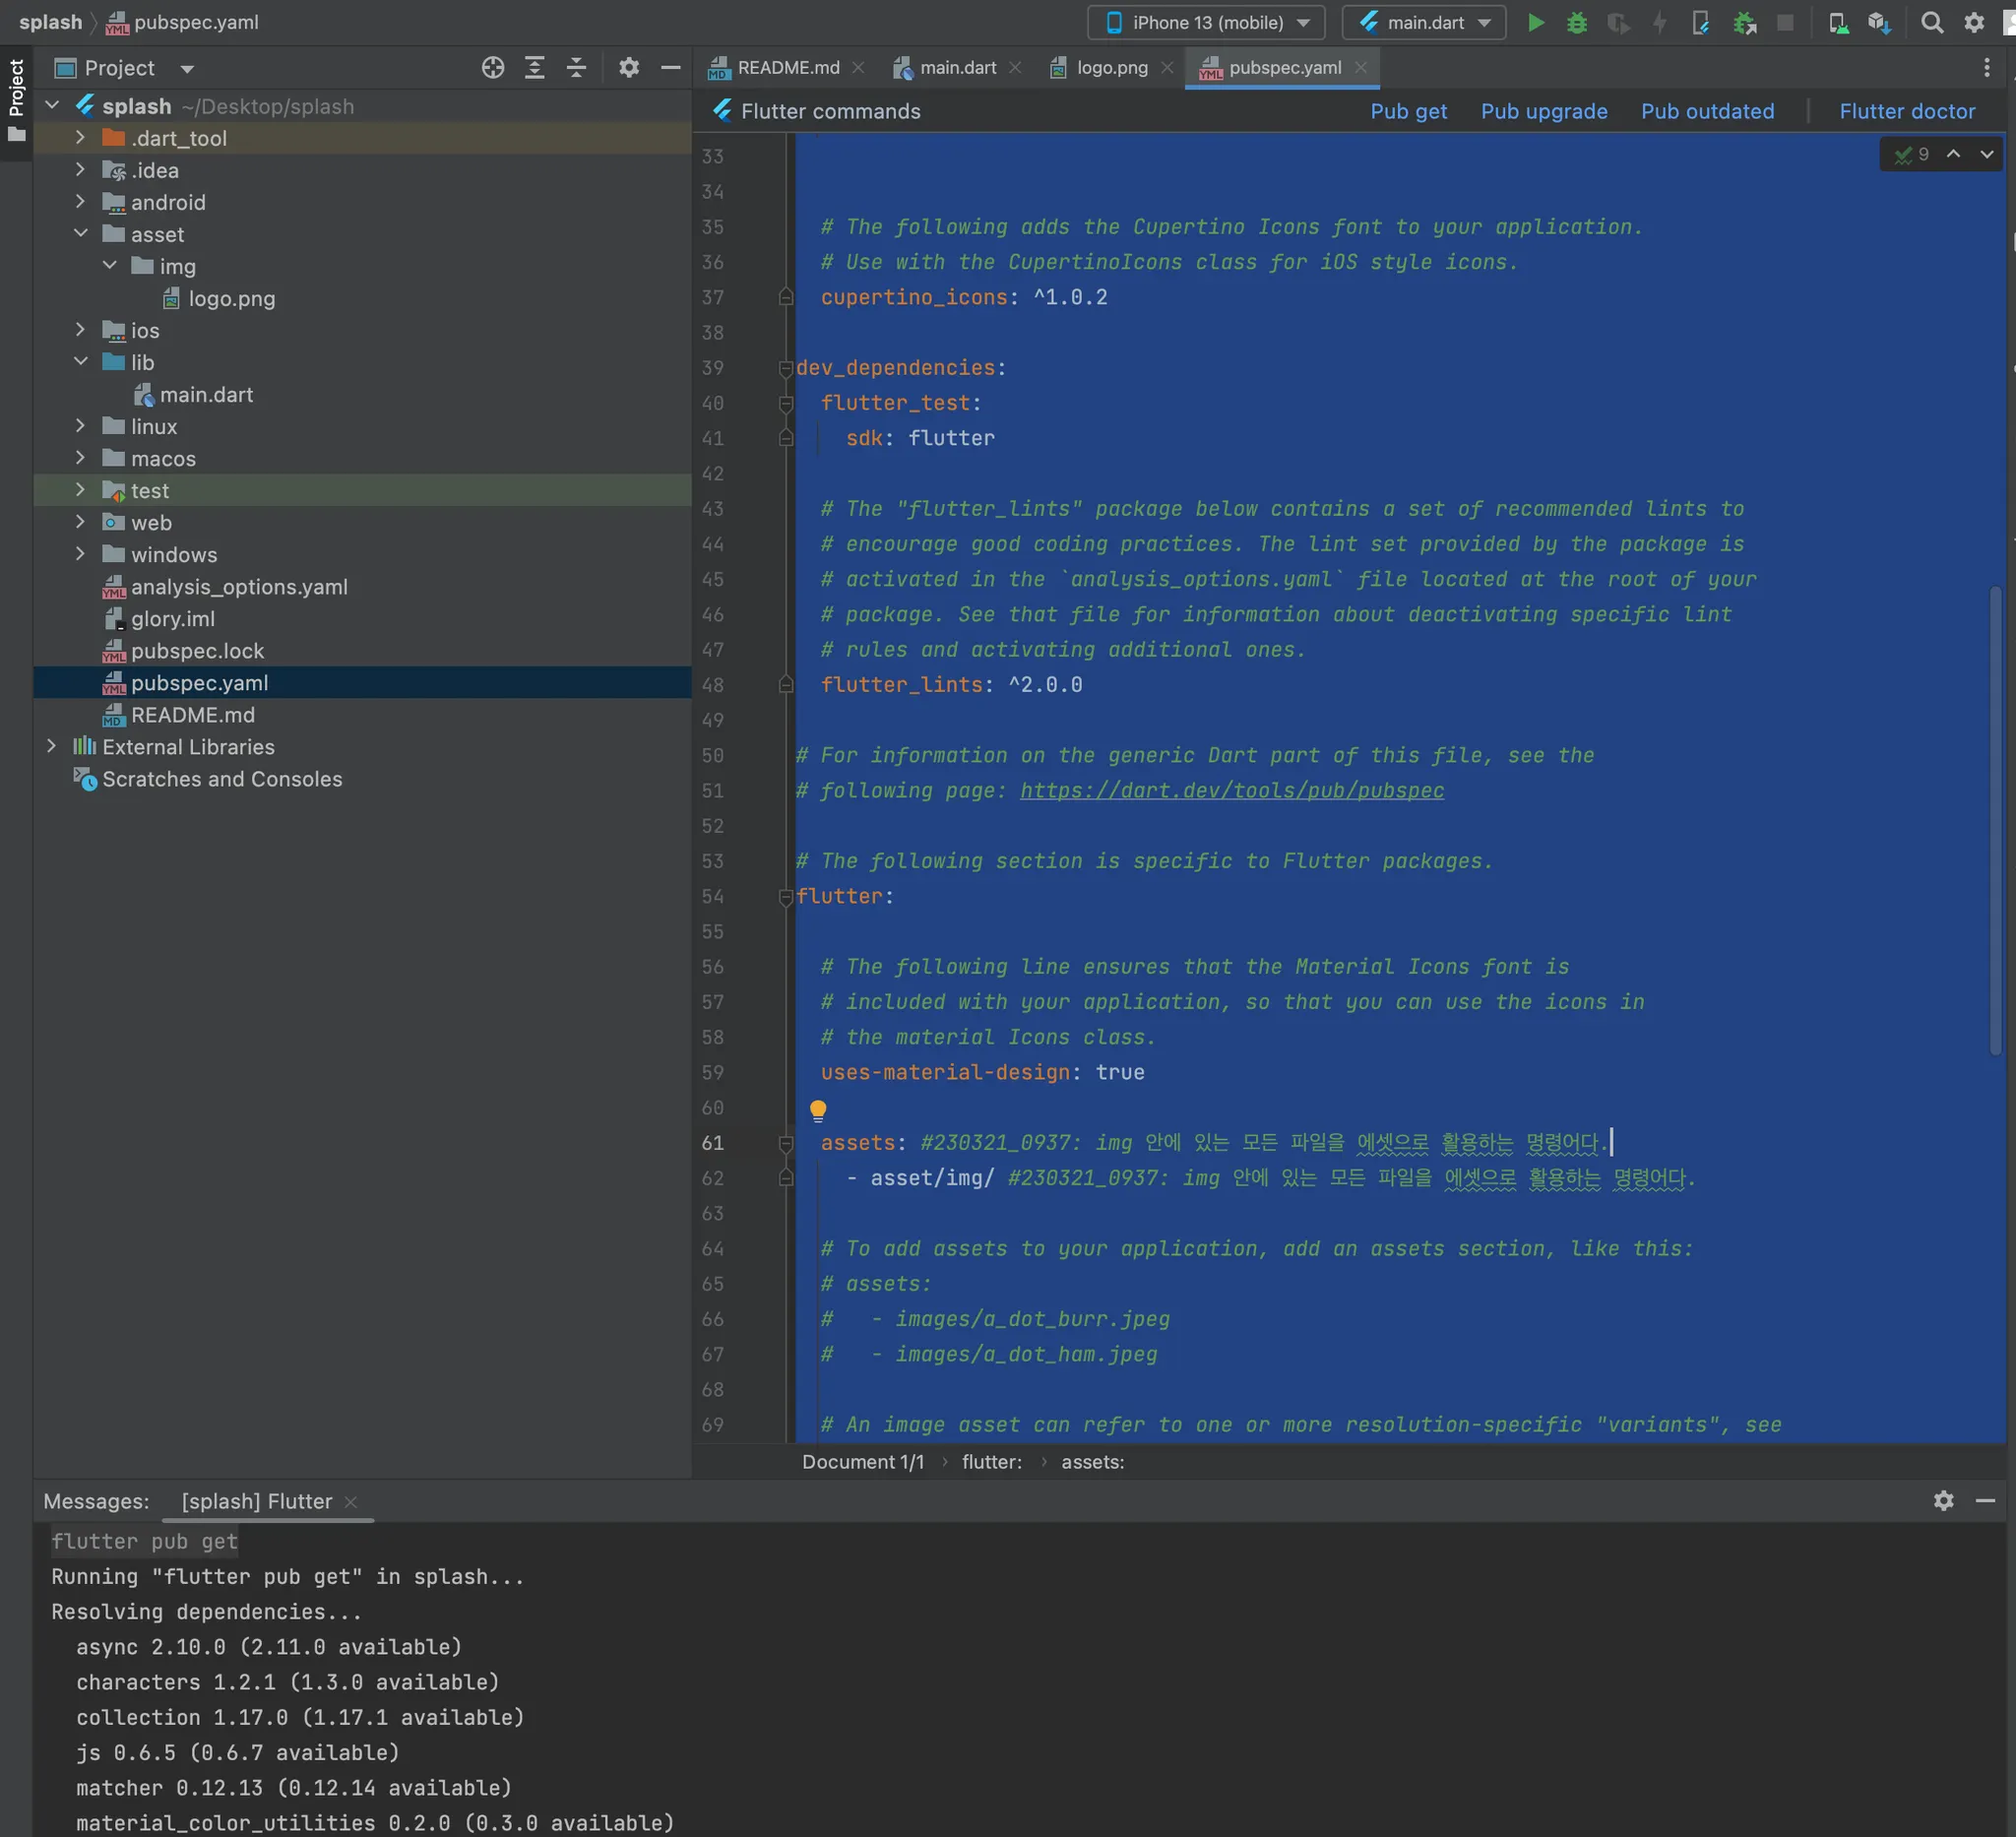
uses-material-design: true
assets: #230321_0937: img 안에 있는 모든 파일을 에셋으로 활용하는 명령어다.
- asset/img/ #230321_0937: img 안에 있는 모든 파일을 에셋으로 활용하는 명령어다.
# To add assets to your application, add an assets section, like this:
# assets:
# - images/a_dot_burr.jpeg
# - images/a_dot_ham.jpeg
# An image asset can refer to one or more resolution-specific "variants", see
# https://flutter.dev/assets-and-images/#resolution-aware
# For details regarding adding assets from package dependencies, see
# https://flutter.dev/assets-and-images/#from-packages
# To add custom fonts to your application, add a fonts section here,
# in this "flutter" section. Each entry in this list should have a
# "family" key with the font family name, and a "fonts" key with a
# list giving the asset and other descriptors for the font. For
# example:
# fonts:
# - family: Schyler
# fonts:
# - asset: fonts/Schyler-Regular.ttf
# - asset: fonts/Schyler-Italic.ttf
# style: italic
# - family: Trajan Pro
# fonts:
# - asset: fonts/TrajanPro.ttf
# - asset: fonts/TrajanPro_Bold.ttf
# weight: 700
#
# For details regarding fonts from package dependencies,
# see https://flutter.dev/custom-fonts/#from-packages
YAML
복사
•
해당 야믈파일을 수정했다면 꼭 오른쪽 상단에 pub get 명령어를 입력해서 반영해야한다.
/Users/zeus/Desktop/splash/lib/main.dart
•
Stateless Widget 사용 방법
import 'package:flutter/material.dart';
void main() {
runApp(
MaterialApp(
home: HomeScreen(),
),
);
}
class HomeScreen extends StatelessWidget {
//빌드 함수를 무조건 오버라이디을 해줘야지 HomeScreen에 부분에 빨간 글씨가 안생긴다
Widget build(BuildContext context) {
return Scaffold(
body: Center(
child: Text(
'Hello World'
),
),
);
}
}
Dart
복사
•
상기 코드로 작성하면 핫 리스타트만 써서 초기화 했지만 핫 리로드도 되도록 세팅할 수 있다.
•
코드 정렬하는 명령어는 다음처럼 세팅하면 된다.
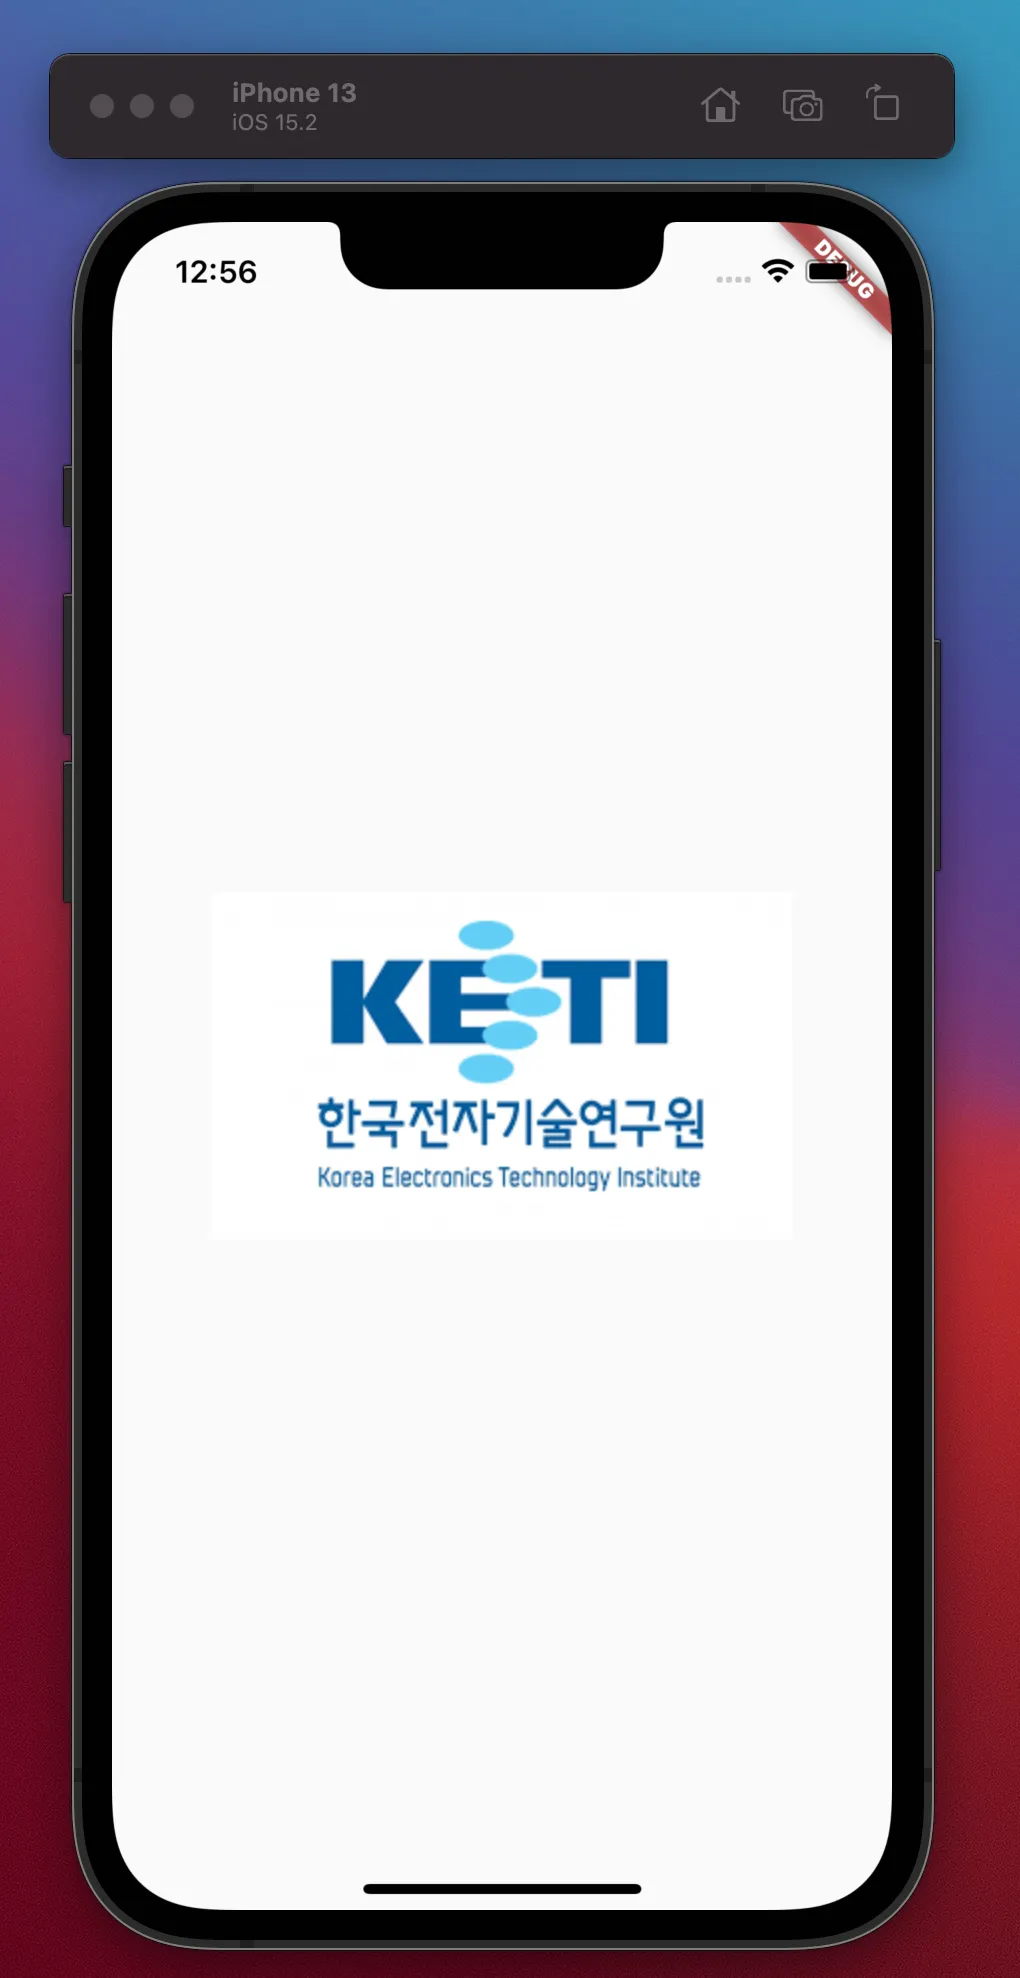
화면에 간단하게 사진 띄우기
import 'package:flutter/material.dart';
void main() {
runApp(
MaterialApp(
home: HomeScreen(),
),
);
}
class HomeScreen extends StatelessWidget {
//빌드 함수를 무조건 오버라이디을 해줘야지 HomeScreen에 부분에 빨간 글씨가 안생긴다
Widget build(BuildContext context) {
return Scaffold(
body: Center(
child: Image.asset('asset/img/logo.png'), // 230321_1255 : 이미지 출력 문
),
);
}
}
Dart
복사

import 'package:flutter/material.dart';
void main() {
runApp(
MaterialApp(
home: HomeScreen(),
),
);
}
class HomeScreen extends StatelessWidget {
//빌드 함수를 무조건 오버라이디을 해줘야지 HomeScreen에 부분에 빨간 글씨가 안생긴다
Widget build(BuildContext context) {
return Scaffold(
body: Column(
mainAxisAlignment: MainAxisAlignment.center,
children: [
Image.asset('asset/img/logo.png'),
],
),
);
}
}
Dart
복사
•
상기 코드는 세로로 정렬한 다음 가운데로 매칭시켜주는 이미지이다.
•
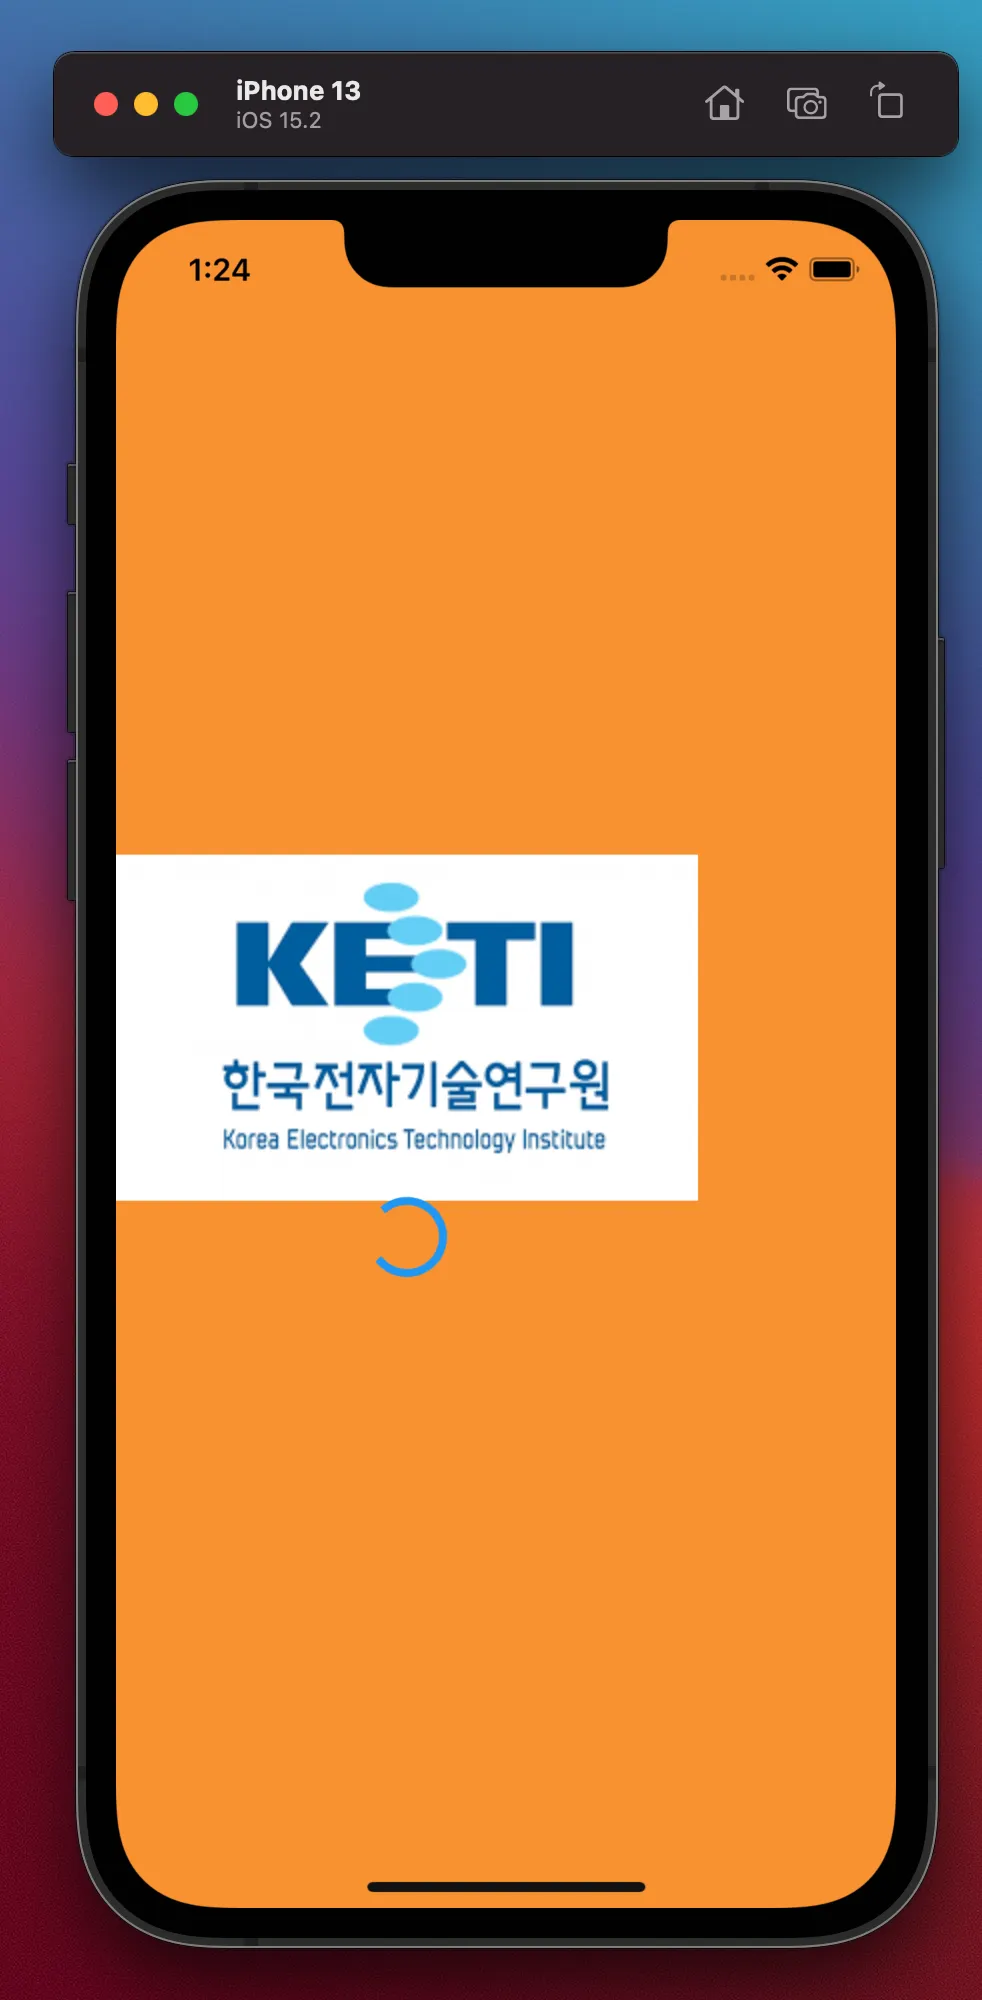
아래 코드는 로딩화면과 배경색상과 색상등을 변경한 코드이다.
import 'package:flutter/material.dart';
void main() {
runApp(
MaterialApp(
home: HomeScreen(),
),
);
}
class HomeScreen extends StatelessWidget {
//빌드 함수를 무조건 오버라이디을 해줘야지 HomeScreen에 부분에 빨간 글씨가 안생긴다
Widget build(BuildContext context) {
return Scaffold(
backgroundColor: Colors.orange,
body: Column(
mainAxisAlignment: MainAxisAlignment.center,
children: [
Image.asset('asset/img/logo.png'),
CircularProgressIndicator( //230321_1304 : 뺑글 뻉글 돌아가는거 보여주는 화면
color:Colors.blue, // 230321_1304 : 뺑글뻉글 돌아가는거 색상 입혀주는 코드
),
],
),
);
}
}
Dart
복사
최종코드
import 'package:flutter/material.dart';
void main() {
runApp(
MaterialApp(
debugShowCheckedModeBanner: false,
home: HomeScreen(),
),
);
}
class HomeScreen extends StatelessWidget {
//빌드 함수를 무조건 오버라이디을 해줘야지 HomeScreen에 부분에 빨간 글씨가 안생긴다
Widget build(BuildContext context) {
return Scaffold(
backgroundColor: Color(0xFFF99231), //230321_1314 : 헥사코드를 사용해서 어플색상 완전 동일하기 하기
body: Column(
mainAxisAlignment: MainAxisAlignment.center,
children: [
Image.asset('asset/img/logo.png'),
CircularProgressIndicator( //230321_1304 : 뺑글 뻉글 돌아가는거 보여주는 화면
color:Colors.blue, // 230321_1304 : 뺑글뻉글 돌아가는거 색상 입혀주는 코드
),
],
),
);
}
}
Dart
복사
출력화면
안녕하세요
•
한국전자기술연구원 김영광입니다.
•
관련 기술 문의와 R&D 공동 연구 사업 관련 문의는 “glory@keti.re.kr”로 연락 부탁드립니다.
Hello
•
I'm Yeonggwang Kim from the Korea Electronics Research Institute.
•
For technical and business inquiries, please contact me at “glory@keti.re.kr”