

import pygame,sys,random
from pygame.locals import *
pygame.init()
mainClock = pygame.time.Clock()
WINDOWWIDTH = 400
WINDOWHEIGHT= 400
windowSurface = pygame.display.set_mode( (WINDOWWIDTH, WINDOWHEIGHT), 0, 32 )
pygame.display.set_caption('Practice keyboardInput')
BLACK = (0,0,0)
GREEN = (0,255,0)
WHITE = (255,255,255)
foodCounter = 0
NEWFOOD = 40
FOODSIZE = 20
player = pygame.Rect(300,150,50,50)
foods = []
for i in range(0,20):
foods.append( pygame.Rect( random.randint(0, WINDOWWIDTH - FOODSIZE),
random.randint(0, WINDOWHEIGHT - FOODSIZE),
FOODSIZE, FOODSIZE)
)
moveLeft=False
moveRight = False
moveUp = False
moveDown = False
MOVESPEED = 6
while True:
for event in pygame.event.get():
if event.type == QUIT:
pygame.quit()
sys.exit()
if event.type == KEYDOWN:
if event.key == K_LEFT or event.key == ord('a'):
moveRight = False
moveLeft = True
if event.key == K_RIGHT or event.key == ord('d'):
moveRight = True
moveLeft = False
if event.key == K_UP or event.key == ord('w'):
moveUp = True
moveDown = False
if event.key == K_DOWN or event.key == ord('s'):
moveUp = False
moveDown = True
if event.type == KEYUP:
if event.key == K_ESCAPE:
pygame.quit()
sys.exit()
if event.key == K_LEFT or event.key == ord('a'):
moveLeft = False
if event.key == K_RIGHT or event.key == ord('d'):
moveRight = False
if event.key == K_UP or event.key == ord('w'):
moveUp = False
if event.key == K_DOWN or event.key == ord('s'):
moveDown = False
if event.key == ord('x'):
player.top = random.randint(0, WINDOWHEIGHT - player.height )
player.left = random.randint(0, WINDOWWIDTH - player.width )
if event.type == MOUSEBUTTONUP:
foods.append(pygame.Rect(event.pos[0], event.pos[1], FOODSIZE, FOODSIZE))
foodCounter += 1
if foodCounter >= NEWFOOD:
foodCounter = 0
foods.append(pygame.Rect(random.randint(0, WINDOWWIDTH-FOODSIZE)
, random.randint(0, WINDOWHEIGHT-FOODSIZE)
, FOODSIZE, FOODSIZE))
windowSurface.fill(BLACK)
if moveDown and player.bottom < WINDOWHEIGHT:
player.top += MOVESPEED
if moveUp and player.top > 0:
player.top -= MOVESPEED
if moveLeft and player.left > 0 :
player.left -= MOVESPEED
if moveRight and player.right < WINDOWWIDTH:
player.left += MOVESPEED
pygame.draw.rect(windowSurface, WHITE, player)
for food in foods[:]:
if player.colliderect(food):
foods.remove(food)
for i in range(len(foods)):
pygame.draw.rect(windowSurface, GREEN, foods[i])
pygame.display.update()
mainClock.tick(40)
Python
복사
구조는 대강 이렇다.
키 이벤트 확인
-> 마우스 이벤트 확인
-> foodCounter가 NEWFOOD보다 크면 상자 하나 추가
-> 캐릭터 이동시키기
-> 캐릭터와 상자 충돌했으면 상자 삭제
-> 화면 표시하기
mainClock.tick(n)
반복문을 초당 n번만 실행하도록 함. 1초가 지나기전 n번 실행했으면, 잠시 프로그램 멈춤
만약 time.sleep()을 사용한다면, 컴퓨터의 성능에 따라 결과가 달라짐.
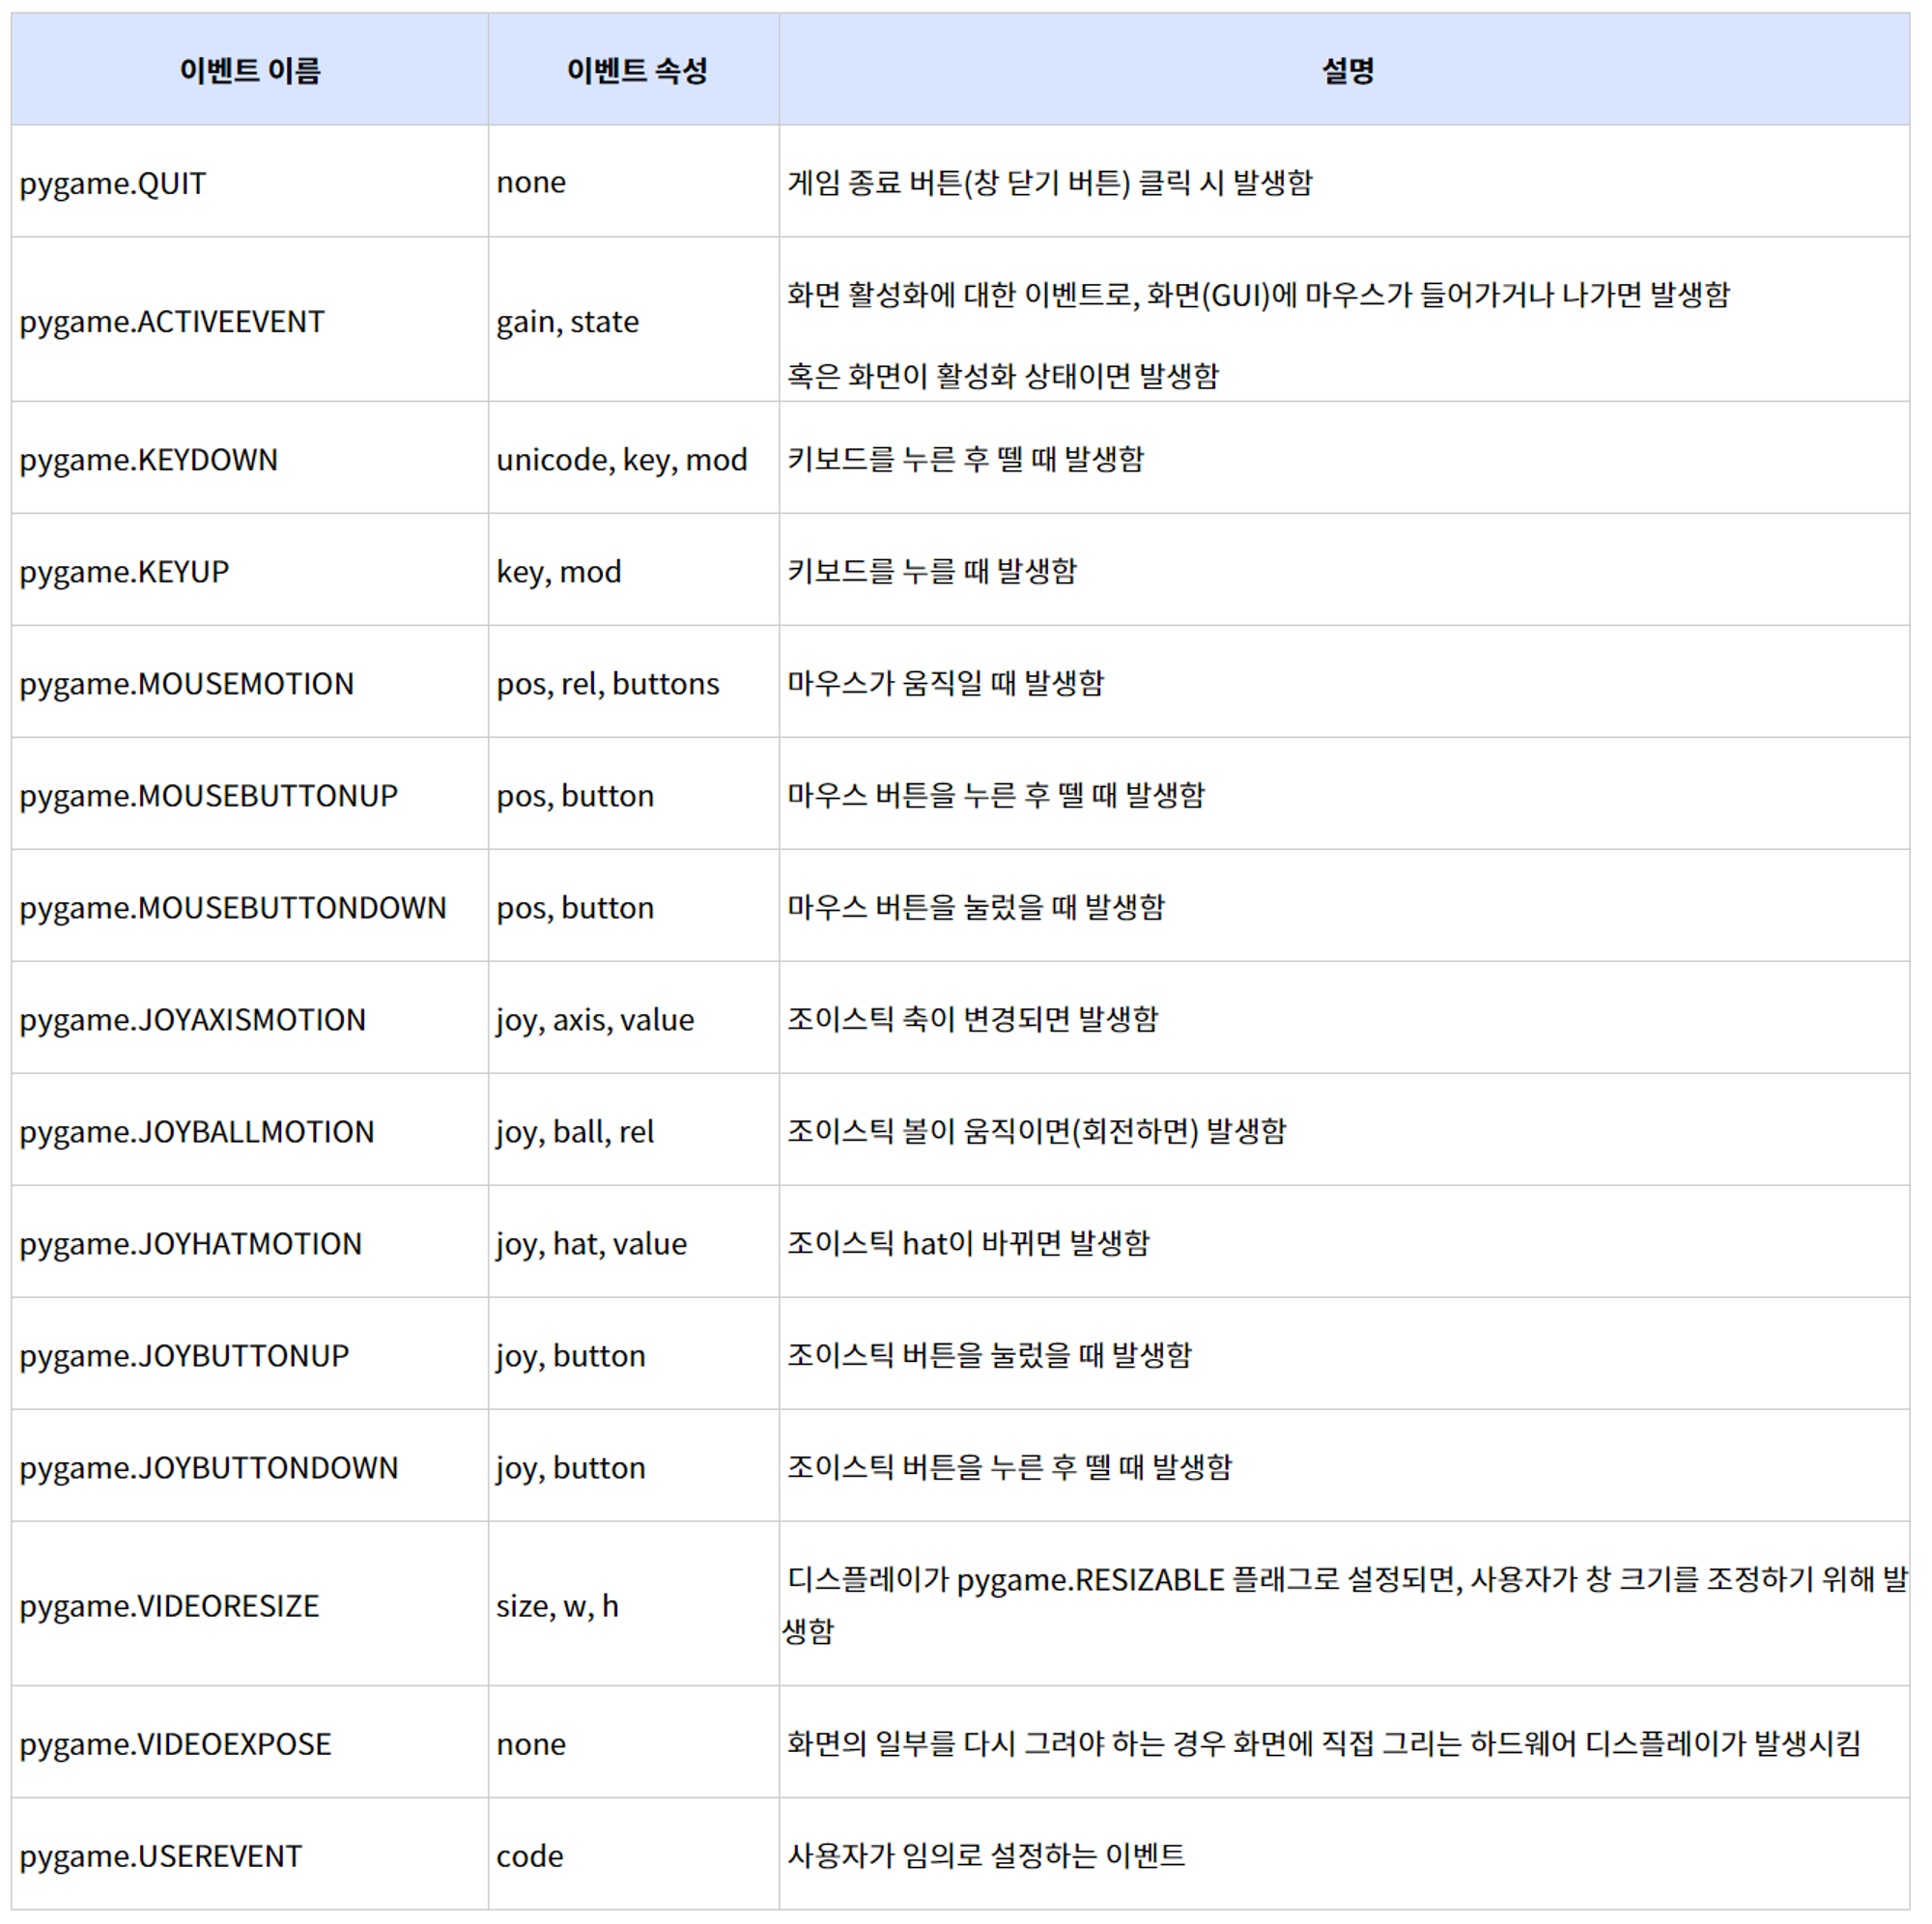
**** 이벤트 타임과 특성이 정리된 링크. 아래 내용들을 포함하고 있음.
http://pygame.org/ftp/contrib/input.html
키보드 이벤트
1) attribute
key : event는 key attribute를 가지며, 이는 어느키가 눌렸는지에 대한 정보를 갖고있다.
키를 지정하기 위해서는 상수 변수(EX:K_LEFT)를 사용하거나, odr()함수에 키를 써넣어 ASCII값을 얻는다.(EX:ord('s'))
mod : mod attribute로는 쉬프트, 컨트롤, 알트나 다른 키를 같이 눌렀는지 알 수 있다.
2) type : 위 코드에서 나온 이벤트 type에는 KEYDOWN과 KEYUP이 있음. 위 두개 attribute는 두 type에 모두 있음(비슷)
마우스 이벤트 - MOUSEMOTION 의 attribute
1) pos : 윈도우에서 마우스의 좌표를 나타내는 (x,y)튜플을 반환
pos[0]에는 x좌표가, pos[1]에는 y좌표가 있음
2) rel : 마지막 MOUSEMOTION 이벤트 후에 얼마나 움직였는지, 즉 상대적인 위치를 알려준다.
마우스 이벤트 - MOUSEBUTTONUP, MOUSEBUTTONDOWN의 attribute
1) pos : 버튼이 눌렸을 때 마우스의 좌표를 나타내는 (x,y)튜플
2) button : 어떤 버튼을 눌렸는지 알려줌. 정수값으로 각 버튼을 나타냄.
1 : 왼쪽버튼 / 2 : 가운데버튼 / 3 : 오른쪽버튼 / 4. 스크롤휠 위쪽 / 5.스크롤휠 아래쪽
colliderect() 메소드
두 그림이 충돌했는지 알려준다.
대상1.colliderect(대상2)
출처
•
소스코드
•
실행환경 주피터 노트북
import sys
import pygame
#the action you want to perform when the key is pressed. Here simply print the event key
#in a real game situation, this action would differ according to the key value
def onkeypress(event):
print(event.key)
#dict of key constants for which you want a longer delay and their tracking time
#in ms, initialized to 0. Here only the spacebar
repeat1000 = {pygame.K_SPACE : 0}
pygame.init()
screen = pygame.display.set_mode((500, 500))
#sets repeat interval to 10 milliseconds for all keys
pygame.key.set_repeat(10)
while True:
for event in pygame.event.get():
if event.type == pygame.QUIT:
sys.exit()
if event.type == pygame.KEYDOWN:
current_time = pygame.time.get_ticks()
if event.key in repeat1000.keys():
if current_time - repeat1000[event.key] > 1000:
repeat1000[event.key] = current_time
onkeypress(event)
elif event.key in [pygame.K_w, pygame.K_a, pygame.K_s, pygame.K_d]:
onkeypress(event)
Python
복사
•
pip install pygame 한 다음
•
파이게임 실행파일 열리면
•
방향키 입력해서 출력된 값을 확인한다.
Python에서 게임 제작에 사용할 수 있는 pyGame 라이브러리 기본 기능에 대해 긴 설명없이 빠르게 훓어볼 수 있도록 정리해보았습니다.
우선 Python에서 UTF-8 한글로 된 주석을 사용하기 위해서는 소스 앞부분에 다음 구문을 추가하여야 한다
# -*- coding: utf-8 -*-
모듈 import
1
2
import pygame # pygame 모듈을 import
from pygame.locals import * # pygame.locals 하위 모듈을 import
pyGame 라이브러리 초기화
라이브러리 초기화를 하지 않을 경우, 일부 기능이 정상 동작하지 않을 수 있다.
1
pygame.init()
디스플레이 초기화
1
2
3
4
5
6
# 1) 화면 해상도를 480*320으로 초기화. 윈도우 모드, 더블 버퍼 모드로 초기화하는 경우
screen = pygame.display.set_mode((480, 320), DOUBLEBUF)
pygame.display.set_caption('Hello World!') # 타이틀바의 텍스트를 설정
# 2) 화면 해상도를 480*320, 전체 화면 모드, 하드웨어 가속 사용, 더블 버퍼 모드로 초기화하는 경우
screen = pygame.display.set_mode((480, 320), FULLSCREEN | HWSURFACE | DOUBLEBUF)
두번째 파라미터는 다음과 같은 flag들을 | 연산자로 조합하여 사용할 수 있다.
FULLSCREEN : 전체 화면 모드를 사용HWSURFACE : 하드웨어 가속 사용. 전체 화면 모드에서만 가능OPENGL : OpenGL 사용 가능한 디스플레이를 초기화DOUBLEBUF : 더블 버퍼 모드를 사용. HWSURFACE or OPENGL에서 사용을 추천
메인 루프
pyGame의 메인 루프는 아래와 같이 크게 세 부분으로 나뉘어진다.
1
2
3
4
5
6
7
8
9
10
while True:
for event in pygame.event.get():
# 이벤트를 처리하는 부분 -> 키보드, 마우스 등의 이벤트 처리 코드가 들어감
...
# 게임의 상태를 업데이트하는 부분
...
# 게임의 상태를 화면에 그려주는 부분 -> 화면을 지우고, 그리고, 업데이트하는 코드가 들어감
...
종료 이벤트 처리
1
2
3
4
5
6
7
8
import sys
# 윈도우의 닫기 버튼이 눌렸을 때, 프로그램을 종료하도록 처리
for event in pygame.event.get():
if event.type == QUIT:
pygame.quit()
sys.exit()
키 이벤트 처리
1
2
3
4
5
6
7
8
9
10
11
12
13
14
15
16
17
18
19
for event in pygame.event.get():
if not hasattr(event, 'key'): # 키 관련 이벤트가 아닐 경우, 건너뛰도록 처리하는 부분
continue
if event.type == KEYDOWN:
if event.key == K_RIGHT:
# 오른쪽 키에 대한 처리
...
elif event.key == K_LEFT:
# 왼쪽 키에 대한 처리
...
elif event.key == K_UP:
# 위쪽 키에 대한 처리
...
elif event.key == K_DOWN:
# 아래 키에 대한 처리
...
elif event.key == K_ESCAPE:
# ESC 키에 대한 처리
...
마우스 이벤트 처리
1
2
3
4
5
6
7
8
9
10
11
12
LEFT = 1 # 왼쪽 버튼에 대한 버튼 인덱스
RIGHT = 3 # 오른쪽 버튼에 대한 버튼 인덱스
if event.type == MOUSEBUTTONDOWN and event.button == LEFT:
# 왼쪽 버튼이 눌렸을 때의 처리
print "left mouse up (%d, %d)" % event.pos
elif event.type == MOUSEBUTTONUP and event.button == LEFT:
# 왼쪽 버튼이 떨어졌을 때의 처리
print "left mouse down (%d, %d)" % event.pos
elif event.type == pygame.MOUSEMOTION:
# 마우스 이동시의 처리
print "mouse move (%d, %d)" % event.pos
색 정의
1
2
3
4
5
BLACK = (0, 0, 0) # R, G, B
RED = (255, 0, 0)
GREEN = (0, 255, 0)
BLUE = (0, 0, 255)
BLUE_A = (0, 0, 255, 127) # R, G, B, Alpha(투명도, 255 : 완전 불투명)
사각형 정의
1
rectangle = (0, 10, 100, 100) # 왼쪽 X, 위 Y, 너비, 높이
화면의 업데이트
1
2
3
4
5
6
# 전체 화면을 업데이트할 경우
pygame.display.flip() # 화면 전체를 업데이트
# 화면의 일부만 업데이트할 경우
pygame.display.update(rectangle) # 업데이트할 rectangle을 지정
pygame.display.update(rectangle_list) # 업데이트할 rectangle을 여러개 지정
프레임 수 맞추기
메인 루프 안에서 FPS(초당 프레임수)를 맞추기 위한 딜레이를 추가해주는 코드. 파라미터로 딜레이 시간이 아닌 목표로 하는 FPS 값이 들어간다.
1
2
3
4
5
6
7
TARGET_FPS = 30
clock = pygame.time.Clock()
while True:
...
clock.tick(TARGET_FPS) # 30 FPS를 맞추기 위한 딜레이를 추가
화면 지우기
1
2
3
# 화면을 그리기에 앞서 지우기 위해 호출한다
screen.fill(BLACK)
기본 도형 그리기
1
2
3
4
5
6
7
8
9
10
11
12
13
14
15
16
17
# 네 점을 지나는 폴리곤을 그린다
pygame.draw.polygon(screen, RED, ((10, 10), (20, 10), (30, 20), (10, 20)))
# 두 점을 지나는 선을 그린다
pygame.draw.line(screen, BLUE, (10, 10), (20, 20))
# 사각형을 그린다 (왼쪽, 위, 너비, 높이 순)
pygame.draw.rect(screen, RED, (10, 10, 100, 50))
# (100, 100)을 중심으로 하는 반지름 10인 원을 그린다
pygame.draw.circle(screen, BLUE, (100, 100), 10)
# 사각형 안을 지나는 타원을 그린다
pygame.draw.ellipse(screen, RED, (10, 10, 100, 50))
# 두 점을 지나는 두께 4의 선을 그린다 (모든 그리기 함수에 두께가 추가될 수 있다)
pygame.draw.line(screen, BLUE, (10, 10), (20, 20), 4)
점 찍기
1
2
3
4
pixelArray = pygame.PixelArray(screen)
pixelArray[10][100] = RED
pixelArray[50][100] = BLUE
del pixelArray # 사용 후, 반드시 PixelArray를 del해줘야 Surface가 lock되는 것을 방지할 수 있다
이미지 파일 다루기
1
2
3
4
5
6
7
8
9
10
11
12
13
# 이미지 파일 그리기
img = pygame.image.load('image.jpg')
screen.blit(img, (50, 100)) # 지정한 좌표가 이미지의 왼쪽 위에 위치하도록 출력된다
# 이미지 파일 회전하여 그리기
img = pygame.image.load('image.jpg')
x = 100
y = 100
degree = 45 # 회전할 각도를 도(degree) 단위로 지정
rotated = pygame.transform.rotate(img, degree)
rect = rotated.get_rect()
rect.center = (x, y) # 지정한 좌표가 이미지의 중심에 오도록 출력된다
screen.blit(rotated, rect)
투명도 처리
pygame.display.set_mode()로 얻어진 기본 Surface에 출력할 경우 투명도는 적용되지 않기 때문에, 아래와 같이 별도의 Surface를 생성하여 처리하여야 한다.
1
2
3
4
5
6
7
8
9
t_surface = screen.convert_alpha() # 기본 Surface(screen)로부터 투명도 처리를 위한 Surface 생성
...
t_surface.fill((0, 0, 0, 0)) # t_surface 전체를 투명한 검정색으로 지운다
pygame.draw.rect(t_surface, (0, 0, 255, 127), (30, 30, 40, 40)) # t_surface에 투명도를 적용하여 그려줌
screen.blit(t_surface, (0, 0)) # t_surface를 기본 Surface에 blit
텍스트 출력하기
1
2
3
4
5
6
7
8
9
10
11
12
13
fontObj = pygame.font.Font('myfont.ttf', 32) # 현재 디렉토리로부터 myfont.ttf 폰트 파일을 로딩한다. 텍스트 크기를 32로 한다
textSurfaceObj = fontObj.render('Hello Font!', True, GREEN) # 텍스트 객체를 생성한다. 첫번째 파라미터는 텍스트 내용, 두번째는 Anti-aliasing 사용 여부, 세번째는 텍스트 컬러를 나타낸다
textRectObj = textSurfaceObj.get_rect(); # 텍스트 객체의 출력 위치를 가져온다
textRectObj.center = (150, 150) # 텍스트 객체의 출력 중심 좌표를 설정한다
screen.blit(textSurfaceObj, textRectObj) # 설정한 위치에 텍스트 객체를 출력한다
# Font 객체 생성의 다른 예
fontObj = pygame.font.Font(None, 32) # 폰트 파일에 None을 지정할 경우 기본 폰트가 사용된다
fontObj = pygame.font.Font('C:\\Windows\\Fonts\\tahoma.ttf', 32) # 윈도우 경로에 있는 폰트를 사용할 경우
# render 함수 사용의 다른 예
textSurfaceObj = fontObj.render('Hello font!', True, GREEN, BLUE) # 텍스트 색을 녹색, 배경색을 파란색으로 설정한다
사운드 출력하기
Wav, Ogg 형식의 사운드 파일을 지원한다.
1
2
3
4
5
6
7
8
9
10
11
12
13
14
15
soundObj = pygame.mixer.Sound('beeps.wav') # 사운드 파일을 로딩한다
soundObj.play() # 사운드 파일을 플레이한다 (플레이가 끝나는 것을 기다리지 않고 바로 리턴된다)
# 5초 후에 플레이를 정지하는 경우
import time
soundObj.play()
time.sleep(5)
soundObj.stop()
# 반복해서 플레이하는 경우 (BGM)
pygame.mixer.music.load('background.mp3')
pygame.mixer.music.play(-1, 0, 0)
종합 예제
1
2
3
4
5
6
7
8
9
10
11
12
13
14
15
16
17
18
19
20
21
22
23
24
25
26
27
28
29
30
31
32
33
34
35
36
37
38
39
40
41
42
43
44
45
46
47
48
49
50
51
52
53
54
55
56
57
58
59
60
61
62
63
64
65
66
67
68
69
70
71
72
73
74
75
76
77
78
79
80
81
82
83
84
85
86
87
88
89
90
91
92
93
94
95
96
97
98
99
# -*- coding: utf-8 -*-
import sys
import pygame
from pygame.locals import *
# 초당 프레임수를 정의
TARGET_FPS = 30
clock = pygame.time.Clock()
# 색 정의
BLACK = (0, 0, 0)
RED = (255, 0, 0)
GREEN = (0, 255, 0)
BLUE = (0, 0, 255)
# 마우스 버튼 인덱스 정의
LEFT = 1 # 왼쪽 버튼에 대한 버튼 인덱스
RIGHT = 3 # 오른쪽 버튼에 대한 버튼 인덱스
# 라이브러리 및 디스플레이 초기화
pygame.init()
screen = pygame.display.set_mode((480, 320), DOUBLEBUF)
# 이미지 파일을 로딩
img = pygame.image.load('image.jpg')
# 폰트 로딩 및 텍스트 객체 초기화
fontObj = pygame.font.Font('myfont.ttf', 32)
textSurfaceObj = fontObj.render('Hello Font!', True, GREEN)
textRectObj = textSurfaceObj.get_rect();
textRectObj.center = (150, 200)
# 사운드 파일을 로딩
soundObj = pygame.mixer.Sound('beeps.wav')
# 메인 루프
while True:
for event in pygame.event.get():
# 이벤트를 처리하는 부분
if event.type == QUIT:
pygame.quit()
sys.exit()
# 키보드 이벤트 처리
if event.type == KEYDOWN:
if event.key == K_RIGHT:
# 오른쪽 키가 눌리면 사운드를 플레이한다
soundObj.play()
# 마우스 이벤트 처리
if event.type == MOUSEBUTTONDOWN and event.button == LEFT:
# 왼쪽 버튼이 눌렸을 때의 처리
print "left mouse up (%d, %d)" % event.pos
elif event.type == MOUSEBUTTONUP and event.button == LEFT:
# 왼쪽 버튼이 떨어졌을 때의 처리
print "left mouse down (%d, %d)" % event.pos
elif event.type == pygame.MOUSEMOTION:
# 마우스 이동시의 처리
print "mouse move (%d, %d)" % event.pos
# 게임의 상태를 업데이트하는 부분
# 게임의 상태를 화면에 그려주는 부분
screen.fill(BLACK) # 화면을 검은색으로 지운다
pygame.draw.line(screen, GREEN, (10, 0), (20, 10)) # 두 점을 지나는 선을 그린다
# 수동으로 점 찍기
pixelArray = pygame.PixelArray(screen)
pixelArray[5][5] = RED
pixelArray[10][10] = RED
del pixelArray
# 이미지 파일 그리기
screen.blit(img, (50, 100))
# 이미지 파일 회전하여 그리기
x = 200
y = 100
degree = 30
rotated = pygame.transform.rotate(img, degree)
rect = rotated.get_rect()
rect.center = (x, y)
screen.blit(rotated, rect)
# 텍스트 오브젝트를 출력
screen.blit(textSurfaceObj, textRectObj)
pygame.display.flip() # 화면 전체를 업데이트
clock.tick(TARGET_FPS) # 프레임 수 맞추기
출처:
[devnauts]